Milking equipment is the most important piece of machinery on a dairy and requires regular maintenance and updating. No milking equipment comes with a lifetime warranty and has to be on a regular monitoring program.

A great starting place is looking at your dairy’s rubber goods. Make sure the milk hoses are as short as possible and have no cracks, tears or restrictions. Oftentimes, just removing 6 to 12 inches of unneeded hose length will lead to a higher claw vacuum and faster milking for basically no cost.
When milk hoses are used too long, they either start to crack or get soft, which leads to cleaning issues. It’s important to watch systems with a pinch shut-off valve because these valves tend to create a soft spot in the milk hose, which can lead to milk flow restrictions (Photo 1).

Short air tubes should be replaced every 90 days with individually damaged short air tubes changed as needed in between. I prefer clear plastic short air tubes because they tear much less often than black rubber short air tubes, and if the inflations get a pinhole or small tear in them, you see milk in the short air tubes.
The long pulsator hoses should be changed at least once a year.
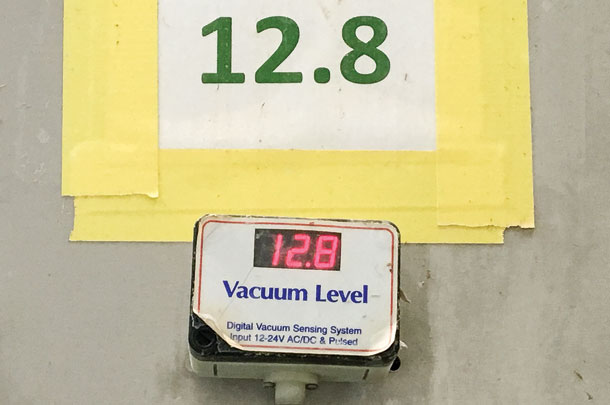
To prevent serious mastitis issues and damaged teats, there should be a digital vacuum gauge easily visible by people milking cows. I suggest putting a sign with the proper vacuum level next to the gauge so people know what normal levels are (Photo 2).
There have been many dairies where vacuum going high or low has caused serious mastitis issues.
The only acceptable way to test a milking machine is to do dynamic testing. This means cows must be tested while they are milking. If a system is not tested while cows are milking, then it is not properly tested.
The only vacuum that really matters is the claw vacuum during peak milk flow and, ideally, the range would be 11.5 to 12.5 inches. The actual vacuum is dependent on the liner used and the flow rates of the cows.
The cow is sensitive to vacuum changes, so you want a milking system that has stable vacuum. Vacuum should not go up or down more than 0.6 inches during milking, even when units are falling off or other unnecessary air leaks are occurring.
Any system with 32 or less units must be able to handle one full unit fall-off and not see a change more than 0.6 inches higher or lower than system vacuum. Systems over 32 units must be able to handle two full unit fall-offs and maintain the vacuum with less than 0.6 inches of change as well.
An excellent test to do on all dairies at the start of every milking is to do the appropriate fall-off test. If system vacuum does not drop or increase more than 0.6 inches, you know air flows are sufficient and either the regulator or variable-speed controller is operating properly.
There are many brands of inflations on the market, and the key is to select the correct brand for your dairy. Inflations can milk slow or fast depending on design along with vacuum levels and pulsator settings.
Every inflation has an ideal claw vacuum during peak milk flow and optimal pulsation setting to assure fast and gentle milking and healthy teat ends. Some inflations are designed to operate at lower vacuum levels while others operate only at higher vacuum levels.
All inflations have a maximum number of milkings they can be used, and it is important these guidelines are followed. Another factor you also need to pay attention to is the total number of washings, because washings are a major way of causing inflations to wear out.
The best rule of thumb is: When inflations are changed and you see a difference in how the cows milk, then you have overused your inflations.
Pulsators need to be properly tested on a regular schedule. The more hours your pulsators operate per day, the more often they should be tested. At the very minimum, a pulsator should be tested once a year, but more and more dairies are testing their pulsators quarterly or monthly.
It is critical pulsators are tested the proper way, which means vacuum is on the claw and each inflation has a teat plug in them so you are simulating milking.
There can be major differences between testing a pulsator properly and improperly, leading to poor results. Recent thoughts are to have the B phase (milk) be between 490 and 525 milliseconds for faster milking and the D phase (rest) be greater than 220 milliseconds for healthier teat ends.
Since many dairies are using sand, it is important to keep the sand granules out of the pulsators. I have dairies putting in fuel filters to protect the pulsators from malfunctioning (Photo 3).

The dairies that have done this have seen dramatic reduction in poor- functioning pulsators.
Keeping the exterior of the units clean during milking is very important for both bacteria counts and reducing environmental mastitis. At the very least, I like the exterior of the milking cluster cleaned after each pen of cows. I prefer using a medicated drop hose to clean the units because it not only does a better job of cleaning the unit but also reduces bacteria numbers.
Putting in a good pump system to medicate your drop hoses with sanitizer works the best. You can also use the medicated drop hoses as a manual backflush system in your parlors. After rinsing the units off, take a few seconds to wipe the shells and mouthpieces of the inflations dry with a cloth towel.
At the end of milking, I suggest properly cleaning the exterior of the units with hot, soapy water before going in the jetter cups.
A good clean-in-place cleaning system is critical to low bacteria counts. High bacteria count is a common cause of degradation or loss of premiums on many dairies. High bacteria counts rarely come from the cows and are mostly caused by poor cleaning of the interior or exterior of the milking system.
A well-designed cleaning system will do a warm water rinse that is not recycled to remove the lactose, a hot water detergent phase that removes the butterfat and protein, and a warm water acid rinse to remove the minerals.
To assure a proper cleaning of the milking system, you must have proper time for each cycle, proper temperature for the water, proper concentration of the chemicals and proper turbulence during washing.
My findings are that most cleaning issues are from poor turbulence and a good slug not being developed to clean the entire surface of the line. Every good cleaning system must have a good air injector to create a slug. The air injector must be properly adjusted and maintained on a regular basis.
A good eye and a flashlight make great tools for evaluating cleaning of your milking system. Look for buildups or residues in your system. If either exists, then you know something is wrong. An excellent place to look for issues is inside the receiver jar or inside the plastic claws or meters.
The temperature of each cycle is very important. Increasing the wash temperature during the detergent phase by 20ºF between 120 and 160ºF actually doubles the cleaning ability of the wash cycle. A change in pH of 1 actually means the concentration of the cleaning chemicals changes by 10 times.
Checking pH and temperatures can often times resolve cleaning issues not caused by poor slug formation.
Maintaining milking equipment is critical to producing quality milk. This is something that needs to be monitored daily. Sit down with your equipment dealer or milk quality expert and design the right maintenance program for your system. A good design can prevent many issues common on all dairies. ![]()
PHOTOS: Photos provided by Andrew Johnson.

-
Andrew Johnson
- Herd Health and Wellness Veterinarian
- Grande Cheese Company
- Email Andrew Johnson